My Lampwork Studio

I have noticed many bloggers giving wonderful tours of their home studios.  I do not have a dedicated studio for my art/craft in my house yet, but I do have a lampwork studio in our detached garage.  Viv asked me about it, and I thought, why not? So, here is a tour of my garage studio.  It is more industrial than cute, but with melting glass, and sometimes exploding glass, it serves it’s purpose:

This is a view of our detached garage, and half of the fuel for my torch – a propane tank.  Dear hubby put in the exhaust vent above the tank:

LampworkStudioTour_1

And here is my studio in one corner of the garage.  In the middle is my work station with my torch, and all around are my tools, supplies, and equipment.  to the right is my kiln for annealing the beads, and below that is my oxygen concentrator (added with propane, fuels the torch).  And above is my air vent and fan. I use a Nortel Minor torch.  It has a graphite marver piggy backing on it so it looks kind of funny.  The little round white things are DH’s socks filled with beans that I use as arm rests 🙂

LampworkStudioTour_2

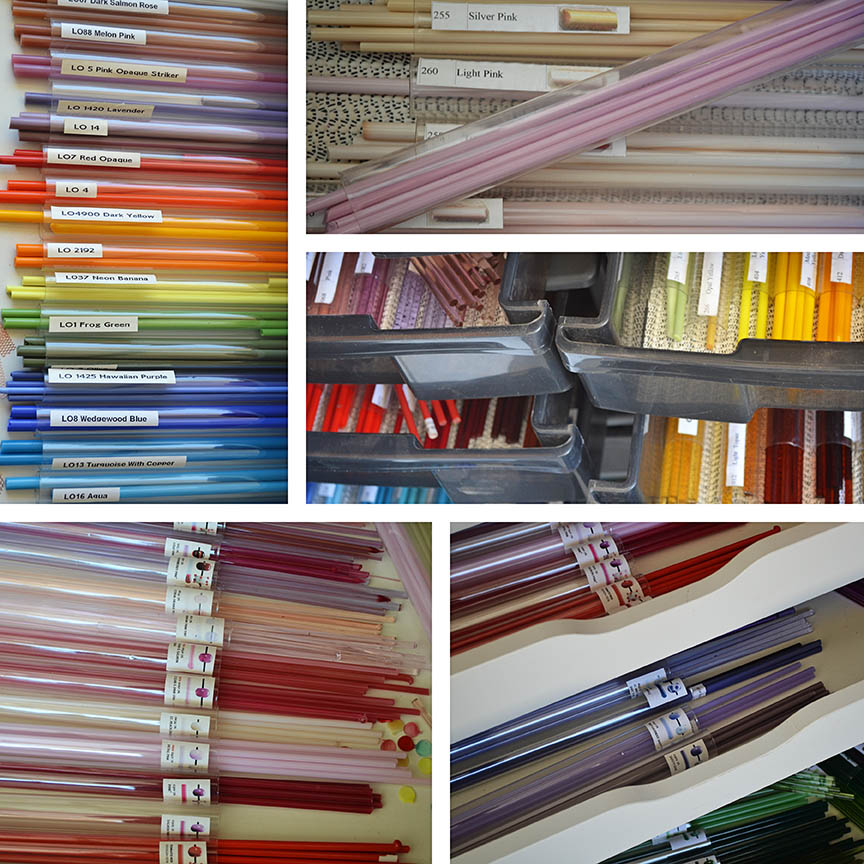
And here are a few of my beautiful glass rods.  I use mainly Moretti and Bullseye rods, but I also have CIM, Lauscha, and Vetrofond.  I just purchased some Devardi rods, which I am looking forward to trying out next session:

LampworkStudioTour_3

These are the tools of the trade.  Marvers, hemostats, molds, presses, scissors, knives, kitchen spoons, mandrels with bead release, and some stringers I pulled for decorating.  Starbucks coffee bottles make really good containers for glass storage:

LampworkStudioTour_4
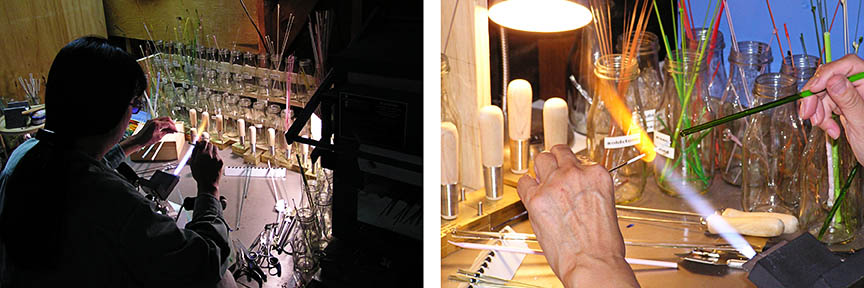
Here I am.  I think these photos were taken a few years back.  You can see I used to drink a lot of starbucks coffee 🙂  I am wearing my didymium safety glasses, melting glass, and winding it on a mandrel.  When I’m done, it gets popped into the kiln for annealing.

LampworkStudioTour_5

Finally, here are some glass beads I have made in the past.  I tend to make florals and rounds in happy cheery colors:

LampworkStudioTour_6

Thank you for stopping by!

– Linda

Citrus Belt Quilters And A Wonderful Gift!

My friend Ellie introduced me to our local Quilters Guild, the Citrus Belt Quilters. I wasn’t sure about a guild, but I enjoyed my guest visit last month, so I joined this month.  They are a very nice organization, full of members with a passion for quilting, and also service to the community.  They also have a little shop at the meetings, where I bought these fabrics for a song.  I think they are perfect for my quilty barn along blocks.  Don’t they look nice and homey drying out in the sun?  And Ellie knew I loved vintage, and gifted me with a bag of wonderful vintage lace and trims.  I think some of them belonged to her mother.  I especially like the little blue fish applique – oh, so many projects to use them in…

Quilters Guild

Pink Saturday And Dolly Dingle

Happy Pink Saturday!  Thank you to Beverly at How Sweet The Sound for hosting this weekly event.

I have been wanting to do this method of printing on muslin for a while now.  As dear hubby always says, it all comes down to having the proper tools.  And since I have all my sewing/cutting/printing tools at hand, I thought I’d give it a go.  As I was perusing around, I came across Aunt Lindy’s Paper Doll fabric panels.  Of course, they have been around for a while, and no one seems to have them anymore, so I found a cute graphic of Dolly Dingle & Billie Bumps, and made my own fabric panels.  I resized and tweaked the graphics in Photoshop first. Here is the process I used, and here is where I got the graphics.  The only deviation from the process was that I ironed the fabric onto the butcher paper first, then used my rotary cutter to cut a nice 8 1/2″ x 11″ .  And the biggest tip in this process is, make sure the muslin (pre-washed) is ironed on really well to the butcher paper.  You can see on my photo where Dolly Dingle near her pantaloons snagged a bit.  Billie Bumps was my second go, and his printout came out pretty good.  I ironed the printout to set the colors ( not sure how well the color washes).  Then I just got backing fabric, sewed around the perimeter, stuffed, embellished, and “voila!” who needs to buy a fabric panel, you can make your own!  Oh, the possibilities are endless!

PinkSaturday_July20a_2013

PinkSaturday_July20b_2013They do look like they lost some weight 🙂 … Oh, and Happy Halloween in July!

Dolls #3 & #4 done! (only 3 to catch up)

– Linda

Quilting Frustrations…

Choosing a design (or having a design chosen for me), choosing fabric, and piecing the quilt top together has been easy peasy.  Now, to actually quilt the three layers has been all together another matter.  Either 20 years ago, quilting was more straightforward, or I didn’t know what I was doing back then, and or there are too many options now.  I am having a bit of a “quilt block”  – as in “mental block”.  I am beginning to understand why so many of my fellow quilters are sending their quilts out to be professionally quilted.  But of course, I have to do everything myself… The first “block” was when I went to purchase the spray baste everyone seems to use, only to be told by the nice fabric store ladies that particular brand had recently been pulled off the shelves because the state of California deemed it hazardous to your health, cancer causing, yadda yadda yadda.  So, I thought, use an alternative spray adhesive? pin baste? hand baste? then, I stumbled on the “Elmer School Glue” basting method.  That sounded the least toxic/time consuming, so I will try that.  Then there was the ordering of the walking foot, and the free hand motion foot – I didn’t know my sewing machine needed so many feet! And last but not least, since no one seems to carry it, I am waiting on the delivery of my quilting pounce…  After it’s all said and done, I would probably have been better off sending it out to be professionally quilted, oh well.  So, I am plodding along…

This little cutie has nothing to do with my quilting efforts.  I just added her in because she is so cute, and she came in a lot of vintage dolls that I recently acquired:

QuiltingJune16_2013

Sewing Pretty With Hello Kitty…

DH pointed out that when I tackle something, I tend to go all out, and then burn out.  Well, I joined a quilting group! The last time I quilted was over 23 years ago, before dear older son was born.  I made a nice new friend, Ellie, who introduced me into her quilting group.  The first week, I lugged my heavy old Singer to quilting, and that was that.  I went shopping for a compact lightweight machine, and this is what I found. A cute Janome Hello Kitty sewing machine! It’s great for piecing and easy to carry around. Two weeks in, and I am working on two quilts!  One for my mom, and the other for my MIL.  I may be ambitious, but I want to make quilts for each of my three children before the year is out.  Hmmm, DH may be right, I may just burn out… Meanwhile, I’m having so much fun!

JanomeHelloKitty

You’re never too old for Hello Kitty  😉

Vintage Christmas In July Swap 2013

I joined in on the Vintage Christmas In July Swap hosted by Erica of Golden Egg Vintage. She partnered me with Kim over at Musings From Kim K – yay! Kim is a pro at antiquing, thrifting, and estate sales.  She finds the most amazing  things and creates even more amazing(er) things.  In fact, her whole family gets involved in a lot of the creating.  So, when my package arrived, I opened it with great anticipation… I will just let the photos do the talking:

VIntageChristmasJulySwap2013

I think I can say that I am ready for Christmas crafting!  Kim even sent me a Santa blow mold – something I have been on the look out for.  Thank you Erica for hosting this fun swap, and thank you Kim for being such a thoughtful swap partner!

Patriotic Ornie Swap 2013

Look who came to celebrate the Fourth of July all the way from England! The sweetest little Patriotic girl I have ever seen!  She is holding a tiny wreath, and has a cute little grin on her face.  Viv over at Viv Out On A Whim organized a Patriotic Ornie Swap, and I was partnered with Hope at Pixie’s Ponderings.  Not only is it fun receiving something specially handmade, but it’s great meeting new people and making friends with other creative like minded women.  Hope made me the most adorable Elizabeth style clothespin girl:

PatrioticOrnieSwap_2013

Thank you Viv for organizing the swap. And thank you Hope for being my partner!

Pink Saturday And Lavender Wands

Happy Pink Saturday!  After visiting the Lavender Festival, I was inspired to make a lavender wand.  If you want instructions, they are all over the web.  It’s pretty straight forward, so I just did it my way.  I don’t know what type of lavender grows in my garden, but it was definitely not the slender petite variety they used at the fair to make the wands.  So, I had to offset the bunch I used.  Basic steps: Pick 15 lavender stalks, remove the leaves.  Tie the bunch with dental floss, bend stalks over the flowers, weave ribbon around, and tie off.  Pretty simple, and the results are even prettier.  The hardest part was competing with the bees for the flowers:

LavenderWand2013

Patriotic Creations

Fourth of July, is one of the holidays I do not have many decorations for.  And that in itself is a good enough reason to craft… So, after doing the Patriotic Ornie Swap, and having all the materials at hand, I decided to make a few more.  I managed to find some really cute vintage dolls on Ebay, and used them to make my latest creations.  I think they came out pretty cute if I do say so myself:

Patriotic2013_Two

Patriotic Ornaments

I had lunch with a few of my friends the other day.  They asked me what do I do with all my vintage finds?  I told them I make things, why?… just because.  I love my friends, but I don’t think they get it.  Right now, it’s just something that gives me pleasure – to create.  So, I made this bunny tussie mussie patriotic ornament for a swap that Viv organized.  I got the tussie mussie idea from Nancy, she makes the prettiest tussie mussies. And here is another one that I made.  I’m glad I was able to use the bunny and teddy.  I might just pick up the giant needles again and make a few more felted cuties (and poke myself in the process).

OrnieSwap_1 OrnieSwap_2

Another Pinkeep

Now that I am in a creative mood, I need to make sure that I actually get to the “creating” part.  I have a tendency to get an idea for a project, gather the materials, then move on to the next idea in my head before implementing and completing my first project.  With this in mind, I sat myself down at my desk  and finished DD’s pinkeep.  Since she will be off to College in the fall, I added a few more things.  I used a vintage Josef owl toothpick holder to hold the little scissors, and thread.  I also added a little button for a needle station. I think it came out pretty cute:

PinkeepM_3

Look Who’s Come To Stay…

I received an unexpected package in the mail the other day…  Can you see him?

Dino1

Yup, a dinosaur planter! Isn’t he cute!  He’s already made himself at home, partying it up by the pool…

Dino2

Checking out Mini Blythe…

Dino3

Success!  Now, they are inseparable…

Dino4

He’s so at home comfy, he’s already borrowing my jewelry:

Dino5

Thank you Chris! ( A Little Creation), my past and ongoing swap buddy 🙂